How to Deploy a Next.js App on a VPS Using GitHub Actions CI/CD Pipeline
ASHISH Gupta
17 min read
- nextjs
- cicd
- vps
- hosting
- github

Introduction
Are you finding the way to host your production website in markets to interact with users. Web hosting is an online service that makes your website’s content accessible on the internet. When you purchase a hosting plan, you are renting space on a physical server to store all the website’s files and data. after writing a production level code you want to Host your nextjs project without any trouble just like big mncs,
in this blog we'll see how to host nextjs project on VPS (Virtual Private Server) and creating CI-CD pipe line with Github Actions.
what is CI-CD Pipeline
A continuous integration and continuous deployment (CI/CD) pipeline is a series of steps that must be performed in order to deliver a new version of software. CI/CD pipelines are a practice focused on improving software delivery throughout the software development life cycle via automation.
By automating CI/CD throughout development, testing, production, and monitoring phases of the software development lifecycle, organizations are able to develop higher quality code, faster and more securely. Although it’s possible to manually execute each of the steps of a CI/CD pipeline, the true value of CI/CD pipelines is realized through automation.
What is VPS
A virtual private server(VPS) is a machine that hosts all the software and data required to run an application or website. It is called virtual because it only consumes a portion of the server's underlying physical resources which are managed by a third-party provider. However, you get access to your dedicated resources on that hardware.
without wasting time let's start.
There Are following steps we'll discuss all steps in following sequence.
step 1: Book a domain and vPS
Register a domain name for your website because we are hosting for production level not for only college level project so based on your project book domain name like example.com or .in based on your need
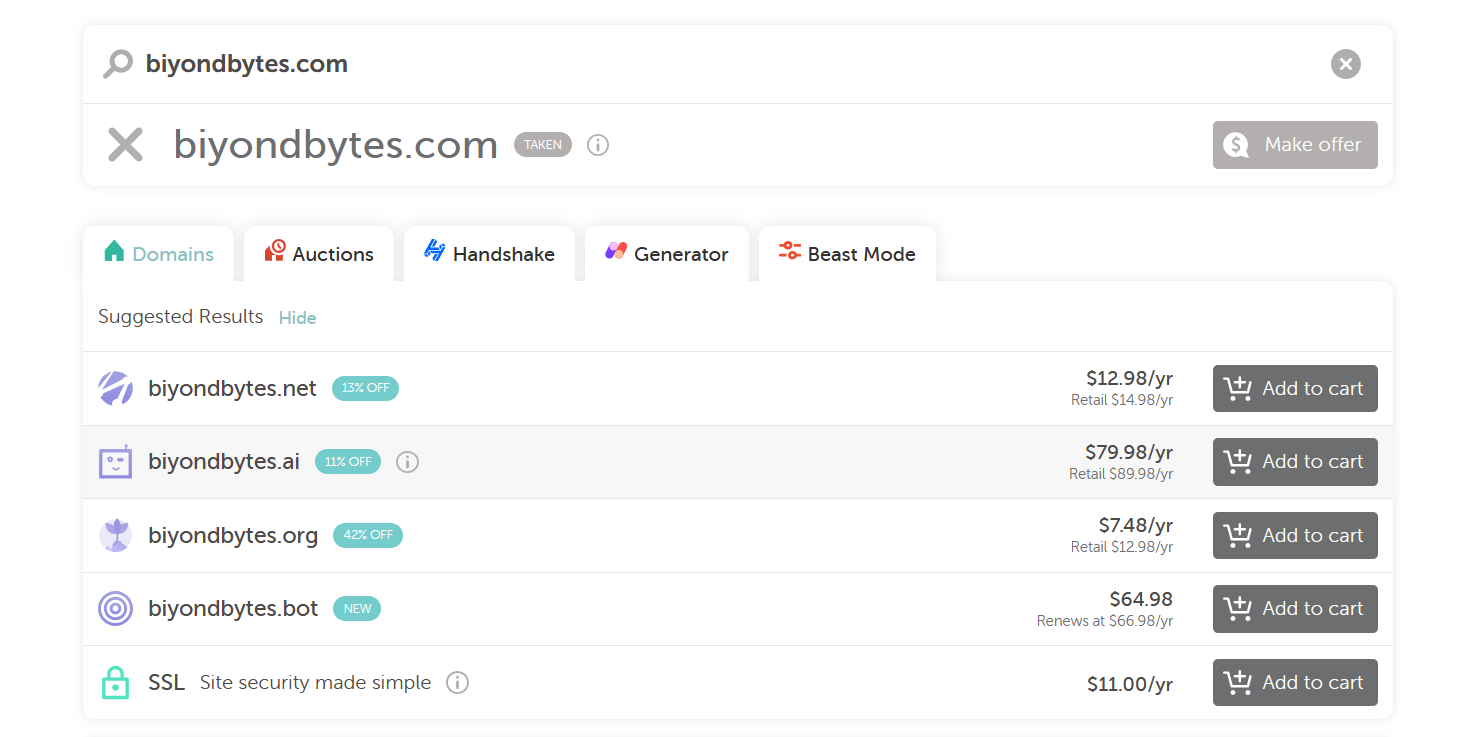
I have already a domain name so that i did not buy again this. but you can book something else.
Now purchase a VPS from any other website where you like. but remember a main thing you have to choose vps details based on your specific need like if you need heavy computing go on to the higher processor and for good computing power and if you want to stream videos so you have to remember for higher Bandwidth.
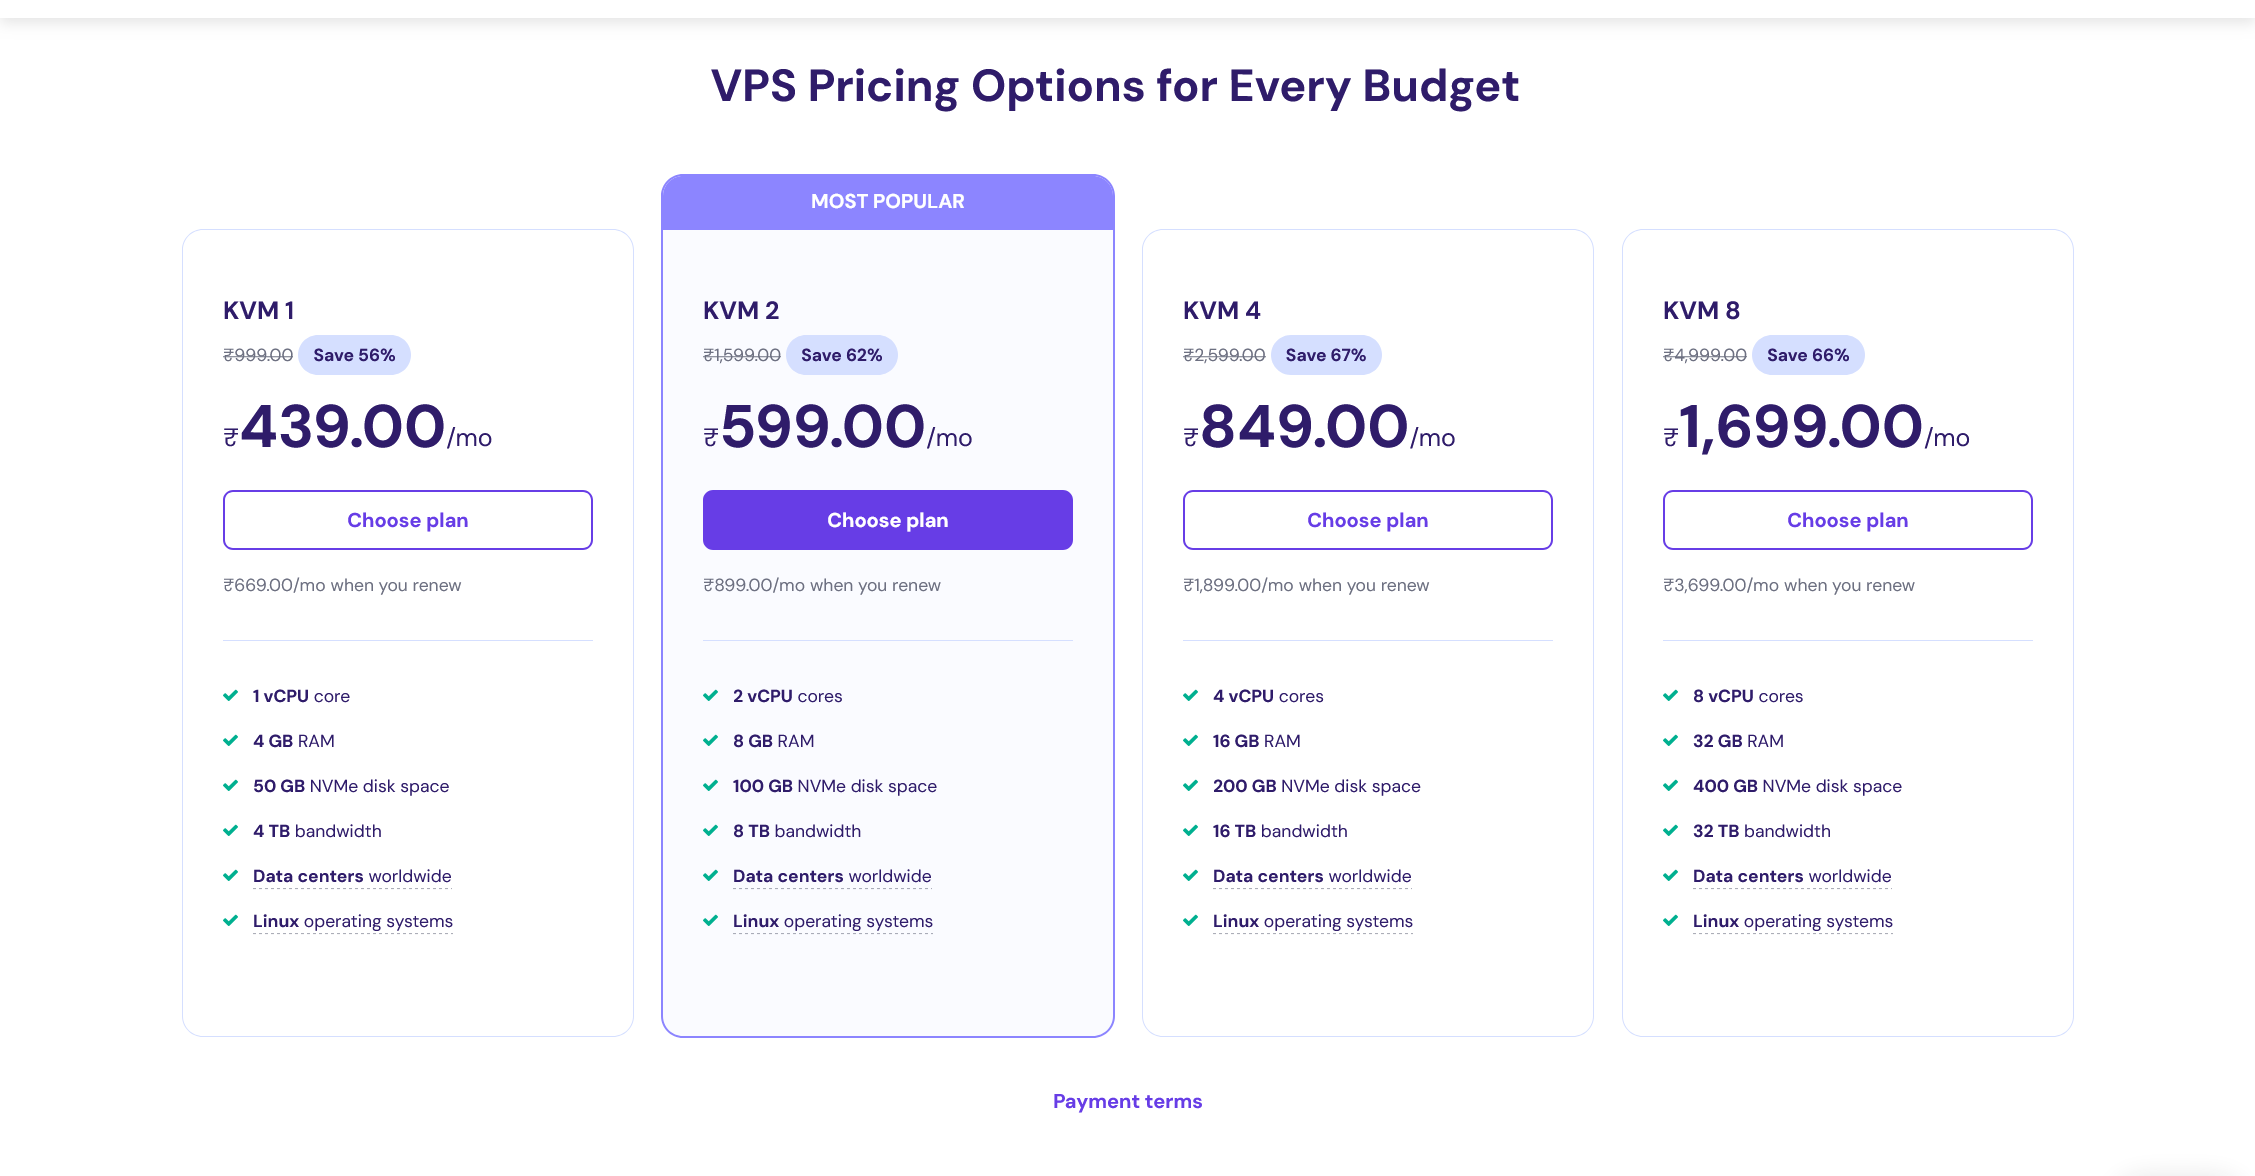
For me i select most popular plan kvm2 for my project.
Step 2: ADD .env to your project
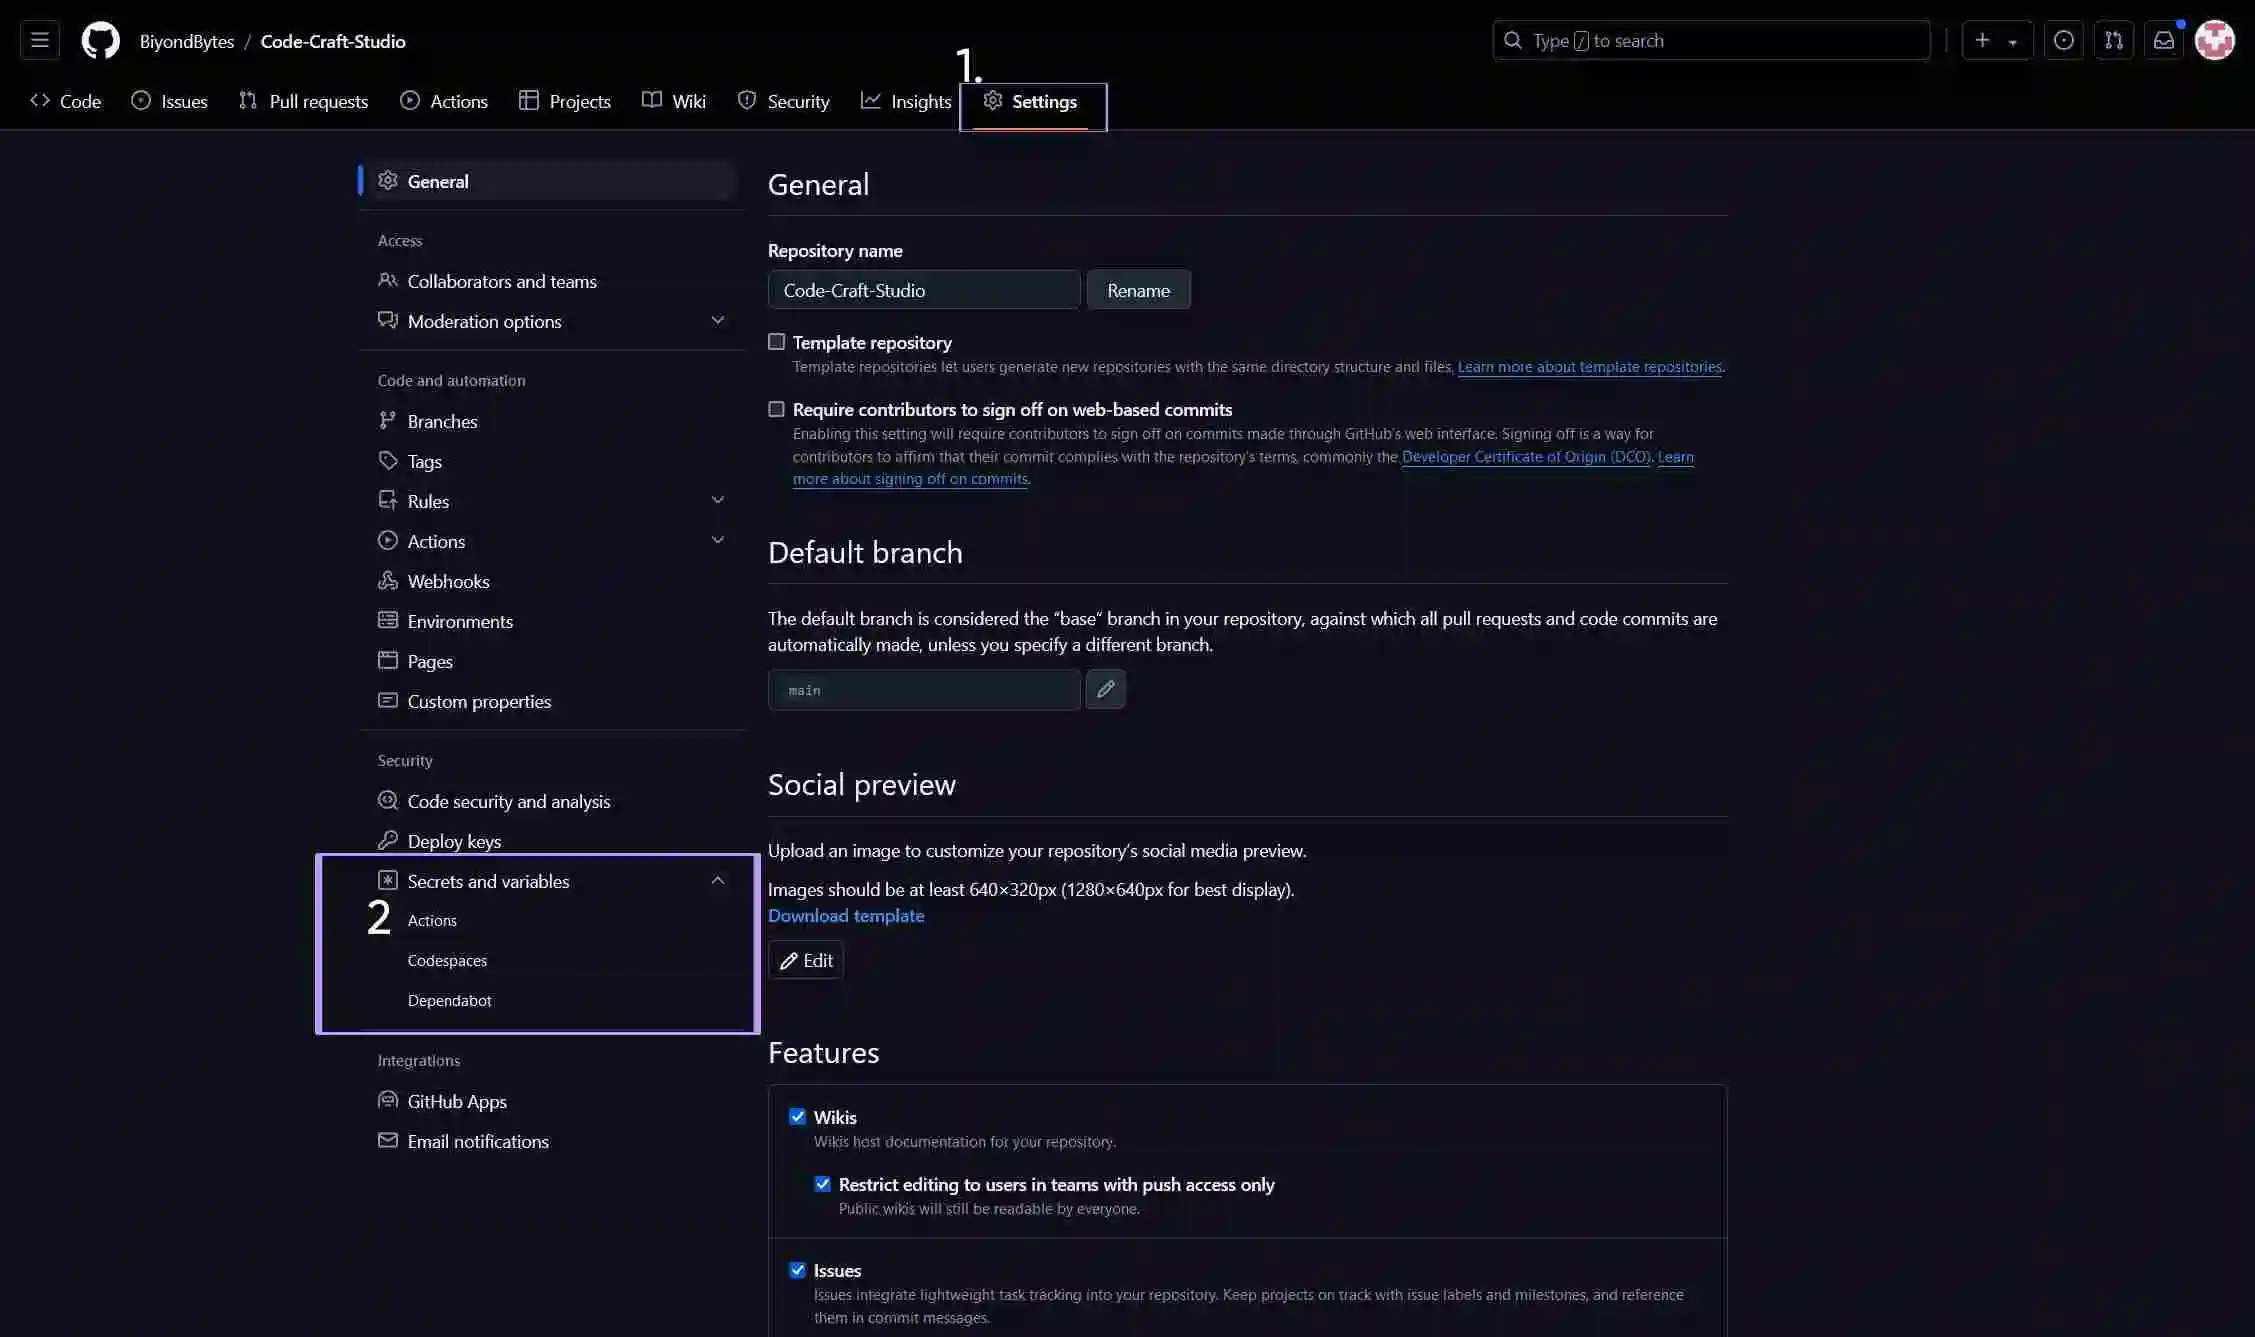
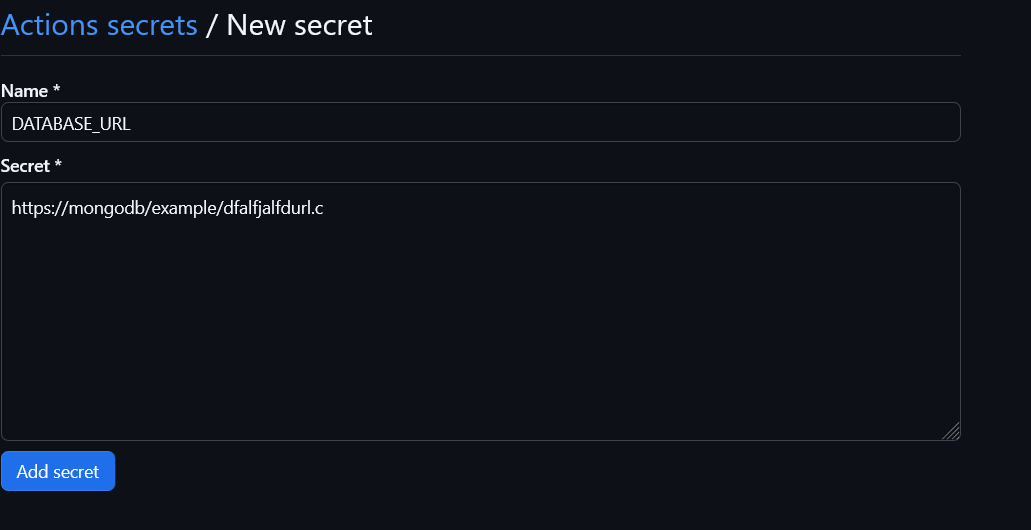
Go to your Github repositories of your project. on top Nav select Settings> on sidebar select Secrets and Variables>Actions.
Step 1:
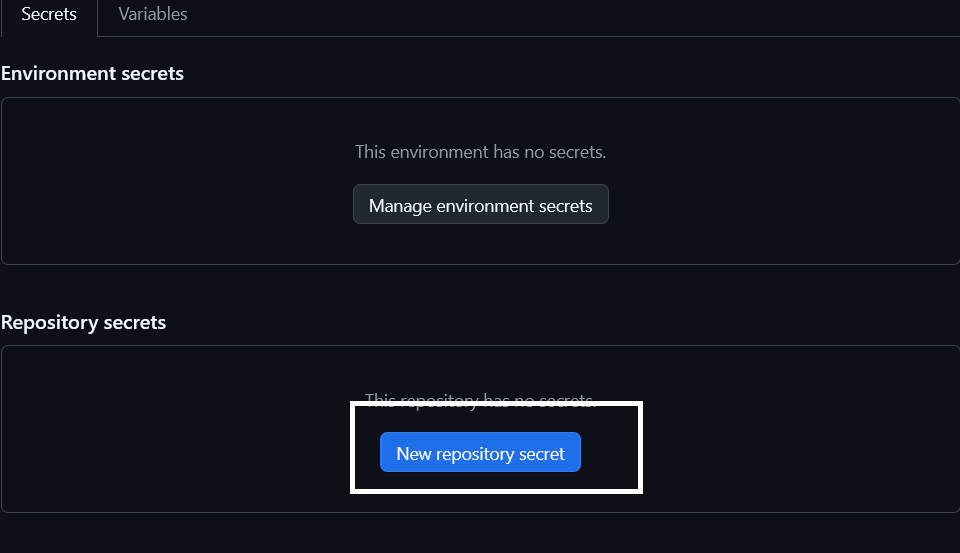
Now click new repository secrets for adding your env key and value:
Now add your envs value and pass key here,repeat these steps while your all env key pair are not over. given urls are example or dummy url don't copy it use your own Database Url.
Step 3: Connect with VPS
open your vps provider website and find manage vps go to the ssh access and copy the command "ssh user@ipv4", example "ssh rootuser@192.143.0.9" copy this command and paste in your terminal
What is SSH access?
SSH (Secure Shell or Secure Socket Shell) is a network protocol that gives users -- particularly systems administrators -- a secure way to access a computer over an unsecured network. SSH also refers to the suite of utilities that implement the SSH protocol.
ssh rootuser@192.143.0.9 //example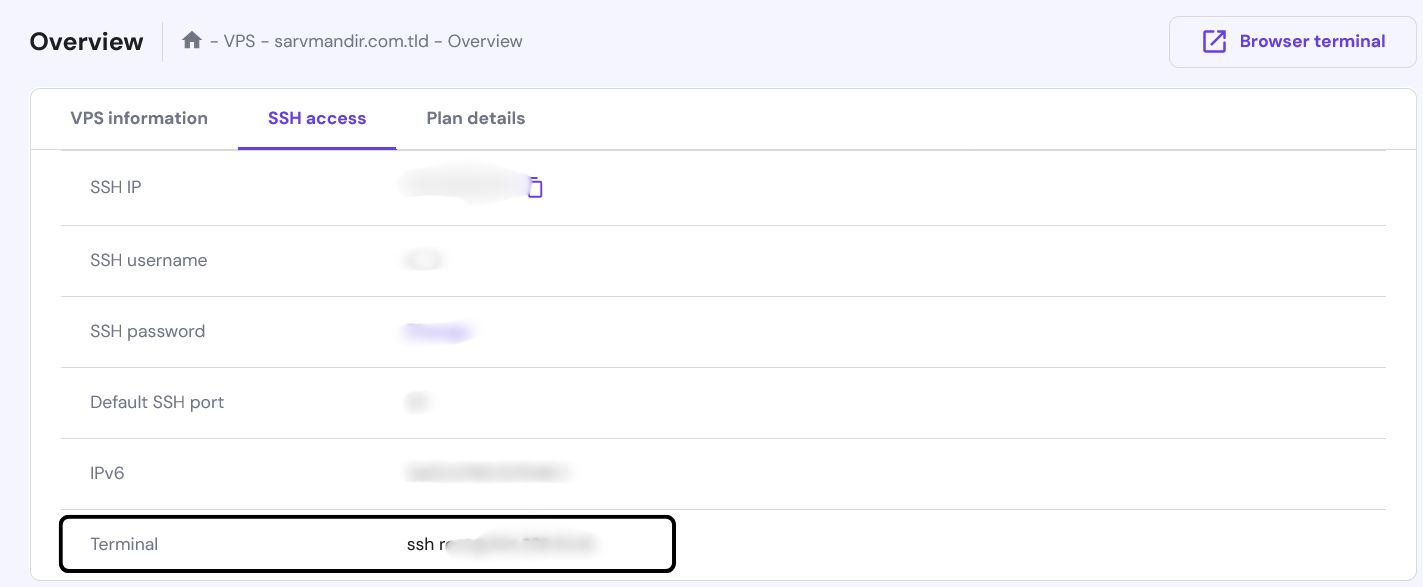
After giving this command in your terminal you got simply enter yes for future access in your local personal computer.
C:\Users\tab>ssh root@194.434.19.45
The authenticity of host '194.434.19.45 (194.434.19.45)' can't be established.
ED25519 key fingerprint is SHA256:xK1XNPDd+mmdfDqtIEz6+JbgVrYaM3mX/xdfS5vS875ZgY. //this is fingerprint key which used logged in easily for future.
This key is not known by any other names
Are you sure you want to continue connecting (yes/no/[fingerprint])? yes
Warning: Permanently added '194.434.19.45' (ED25519) to the list of known hosts.
root@194.434.19.45's password://
Welcome to Ubuntu 22.04.4 LTS (GNU/Linux 5.15.0-119-generic x86_64)
here i already created my password if you don't you have to set password in your vps server with your provider.

Here is your sections to change your password in your vps provider. After login your vps interface will look like this.
Welcome to Ubuntu 22.04.4 LTS (GNU/Linux 5.15.0-119-generic x86_64)

 * Documentation:  https://help.ubuntu.com
 * Management:     https://landscape.canonical.com
 * Support:        https://ubuntu.com/pro

 System information as of Sat Aug 31 05:42:56 UTC 2024

  System load:  0.02               Processes:             136
  Usage of /:   25.5% of 96.73GB   Users logged in:       0
  Memory usage: 38%                IPv4 address for eth0: 194.434.19.45
  Swap usage:   0%                 IPv6 address for eth0: 2a02:3780:12:f546::1

 * Strictly confined Kubernetes makes edge and IoT secure. Learn how MicroK8s
   just raised the bar for easy, resilient and secure K8s cluster deployment.

   https://ubuntu.com/engage/secure-kubernetes-at-the-edge

Expanded Security Maintenance for Applications is not enabled.

14 updates can be applied immediately.
To see these additional updates run: apt list --upgradable

Enable ESM Apps to receive additional future security updates.
See https://ubuntu.com/esm or run: sudo pro status


Last login: Fri Aug 30 06:56:49 2024 from 103.71.255.176
root@sarvmandir:~#
This is your root user enter command this command
root@sarvmandir:~# sudo apt update
root@sarvmandir:~# sudo apt upgrade
you are ready to host your project,we don't host directly project in your root user because in future you may host multiple projects or multiple different ideas in your user so we make a different user and give root permissions, follow these steps.
step 4: Create the new user
Create the new user: Open the terminal and use the
addusercommand to create a new user. Replaceusernamewith the desired username for example biyondbytes.
sudo adduser usernameexample:
root@sarvmandir:~# sudo adduser studio
Adding user `studio' ...
Adding new group `studio' (1004) ...
Adding new user `studio' (1004) with group `studio' ...
Creating home directory `/home/studio' ...
Copying files from `/etc/skel' ...
New password://enter a new password
Retype new password:
passwd: password updated successfully
Changing the user information for studio
Enter the new value, or press ENTER for the default
        Full Name []: biyondbytes
        Room Number []:for nothing press enter
        Work Phone []:
        Home Phone []:
        Other []:
Is the information correct? [Y/n] y
*refer this and do same thing for your project but choose username and password according to your choice.
Add the user to the sudo group: Adding the user to the
sudogroup grants them root permissions. Execute the following command:
sudo usermod -aG sudo username
The -aG option in the sudo usermod -aG username command stands for:
-a(append): This option appends the user to the supplementary groups mentioned without removing them from any other groups they might already be a part of. If you don't use-a, the user will be removed from all other groups except the one you specify.-G(group): This option specifies the group(s) to which you want to add the user. You can list multiple groups separated by commas.
Verify the user's sudo privileges: You can verify that the user has sudo privileges by switching to the new user and running a command with
sudo. For example:
su - username
sudo whoami
Login to your user with this command where we setup your project in your terminal.
sudo su - usernamefor reference here is your example.
root@sarvmandir:~# sudo usermod -aG sudo studio
root@sarvmandir:~# sudo su - studio
To run a command as administrator (user "root"), use "sudo <command>".
See "man sudo_root" for details.
studio@sarvmandir:~$
step 5:Installing Node Using the Node Version Manager
Another way of installing Node.js that is particularly flexible is to use nvm, the Node Version Manager. This piece of software allows you to install and maintain many different independent versions of Node.js, and their associated Node packages, at the same time.
To install NVM on your Ubuntu 20.04 machine, visit the project’s GitHub page. Copy the curl command from the README file that displays on the main page. This will get you the most recent version of the installation script.
Before piping the command through to bash, it is always a good idea to audit the script to make sure it isn’t doing anything you don’t agree with. You can do that by removing the | bash segment at the end of the curl command:
curl -o- https://raw.githubusercontent.com/nvm-sh/nvm/v0.39.3/install.sh
Review the script and make sure you are comfortable with the changes it is making. When you are satisfied, run the command again with | bash appended at the end. The URL you use will change depending on the latest version of nvm, but as of right now, the script can be downloaded and executed with the following:
curl -o- https://raw.githubusercontent.com/nvm-sh/nvm/v0.39.3/install.sh | bash
This will install the nvm script to your user account. To use it, you must first source your .bashrc file:
source ~/.bashrc
Now, you can ask NVM which versions of Node are available:
nvm list-remoteOutput. . .
v20.7.0
v20.8.0
v20.8.1
v20.9.0 (LTS: Iron)
v20.10.0 (LTS: Iron)
v20.11.0 (LTS: Iron)
v20.11.1 (LTS: Iron)
v20.12.0 (LTS: Iron)
v20.12.1 (LTS: Iron)
v20.12.2 (LTS: Iron)
v20.13.0 (LTS: Iron)
v20.13.1 (LTS: Iron)
v20.14.0 (LTS: Iron)
v20.15.0 (LTS: Iron)
v20.15.1 (LTS: Iron)
v20.16.0 (LTS: Iron)
-> v20.17.0 (Latest LTS: Iron)
v21.0.0
v21.1.0
v22.6.0
v22.7.0
It’s a very long list. You can install a version of Node by writing in any of the release versions listed. For instance, to get version v14.10.0, you can run:
nvm install v20.17.0
You can view the different versions you have installed by listing them:
nvm listOutput-> -> v20.17.0
default -> v20.17.0
iojs -> N/A (default)
unstable -> N/A (default)
node -> stable (-> v20.17.0) (default)
stable -> 20.17 (-> v20.17.0) (default)
lts/* -> lts/iron (-> v20.17.0)
lts/argon -> v4.9.1 (-> N/A)
lts/boron -> v6.17.1 (-> N/A)
lts/iron -> v20.17.0
. . .
This shows the currently active version on the first line (-> v14.10.0), followed by some named aliases and the versions that those aliases point to.
Note: if you also have a version of Node.js installed through apt, you may receive a system entry here. You can always activate the system-installed version of Node using nvm use system.
Additionally, there are aliases for the various long-term support (or LTS) releases of Node:
lts/argon -> v4.9.1 (-> N/A)
lts/boron -> v6.17.1 (-> N/A)
lts/carbon -> v8.17.0 (-> N/A)
lts/dubnium -> v10.24.1 (-> N/A)
lts/erbium -> v12.22.12 (-> N/A)
lts/fermium -> v14.21.3 (-> N/A)
lts/gallium -> v16.20.2 (-> N/A)
lts/hydrogen -> v18.20.4 (-> N/A)
lts/iron -> v20.17.0
You can install a release based on these aliases as well. For instance, to install the latest long-term support version, hydrogen, run the following:
nvm install lts/hydrogenOutputDownloading and installing node v18.13.0...
. . .
Now using node v18.13.0 (npm v8.19.3)
You can switch between installed versions with nvm use:
nvm use v20.17.0OutputNow using node v14.10.0 (npm v6.14.8)
```
You can verify that the install was successful using the same technique from the other sections:
```command
node -vOutputv20.17.0
The correct version of Node is installed on your machine as expected. A compatible version of npm is also available.
Removing Node.js
You can uninstall Node.js using apt or nvm, depending on how it was installed. To remove the version from the system repositories, use apt remove:
sudo apt remove nodejs
By default, apt remove retains any local configuration files that were created since installation. If you don’t want to save the configuration files for later use, use apt purge:
sudo apt purge nodejs
To uninstall a version of Node.js that you installed using nvm, first determine whether it is the current active version:
nvm current
If the version you are targeting is not the current active version, you can run:
nvm uninstall node_versionOutputUninstalled node node_version
This command will uninstall the selected version of Node.js.
If the version you would like to remove is the current active version, you first need to deactivate nvm to enable your changes:
nvm deactivate
Step 6 : Setup Actions Runner
Que- what is GitHub actions runner?
Ans- Runners are the machines that execute jobs in a GitHub Actions workflow.
go to your GitHub repository and then setting>sidebar>actions>runner>New Self-hosted Runner.
After clicking on self hosted runner you some commands for your Linux vps copy and paste all the commands in your terminal.
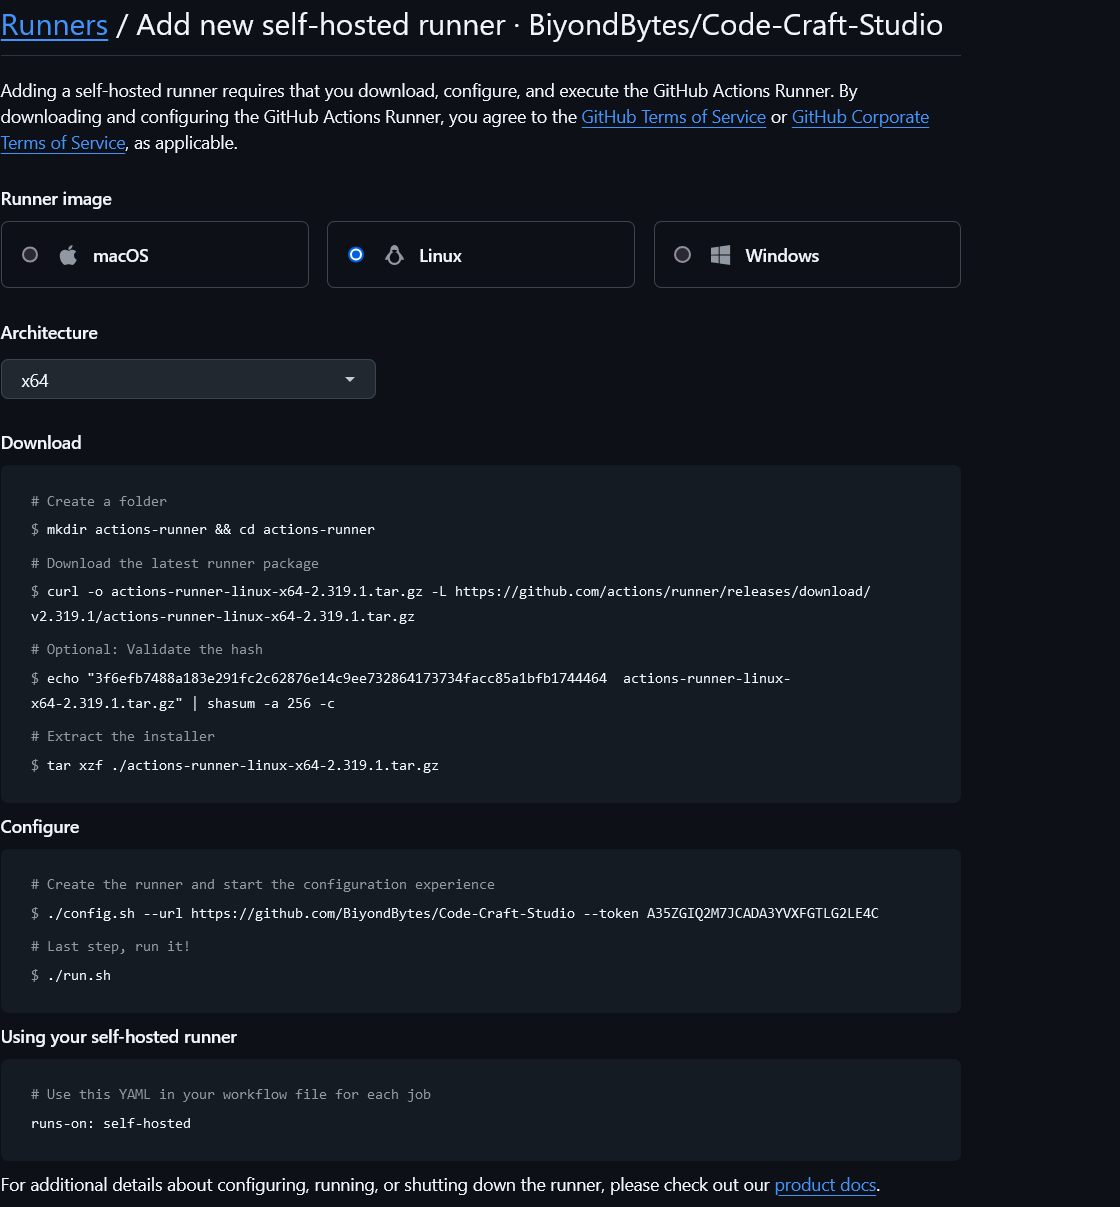
After following these commands you may get this interface.
# Authentication


√ Connected to GitHub

# Runner Registration

Enter the name of the runner group to add this runner to: [press Enter for Default]

Enter the name of runner: [press Enter for sarvmandir] studio

This runner will have the following labels: 'self-hosted', 'Linux', 'X64'
Enter any additional labels (ex. label-1,label-2): [press Enter to skip]

√ Runner successfully added
√ Runner connection is good

# Runner settings

Enter name of work folder: [press Enter for _work]

√ Settings Saved.

studio@sarvmandir:~/actions-runner$ ls
_diag                                    bin        env.sh     run-helper.cmd.template  run.sh         svc.sh
actions-runner-linux-x64-2.319.1.tar.gz  config.sh  externals  run-helper.sh.template   safe_sleep.sh
now use
./run.shwhen you give command ./run.sh your your github runner will become idle.
*example
studio@sarvmandir:~/actions-runner$ ./run.sh

√ Connected to GitHub

Current runner version: '2.319.1'
2024-08-31 06:50:28Z: Listening for Jobs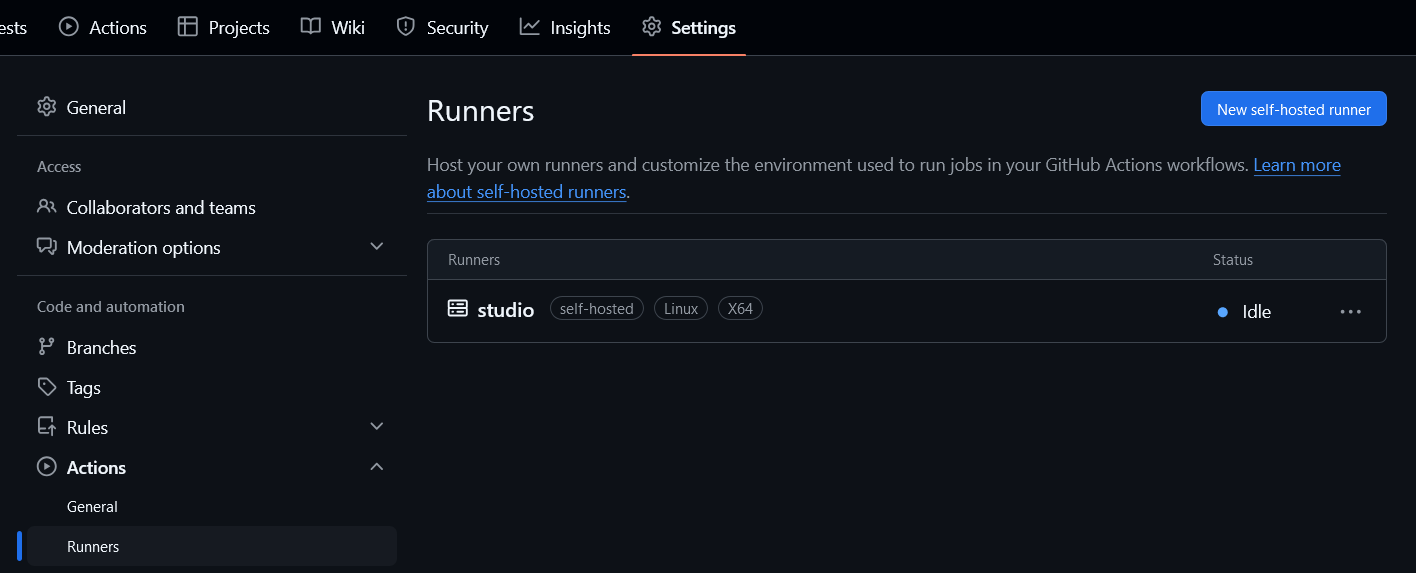
but use of "./run.sh" will run temporally so we have to listen every time when you add some commit to your main branch repositories.
follow these commands for connections every time with your GitHub repositories.
sudo ./svc.sh installsudo ./svc.sh startfor checking or getting status or may want to stop the runner so use.
sudo ./svc.sh stopsudo ./svc.sh statusStep 7: Configure For Ci-Cd
Now set up Ci-Cd when you commit some thing then your vps will build the project using nodjs workflow we write something in your project repositories, making a .workflow/node.yaml file
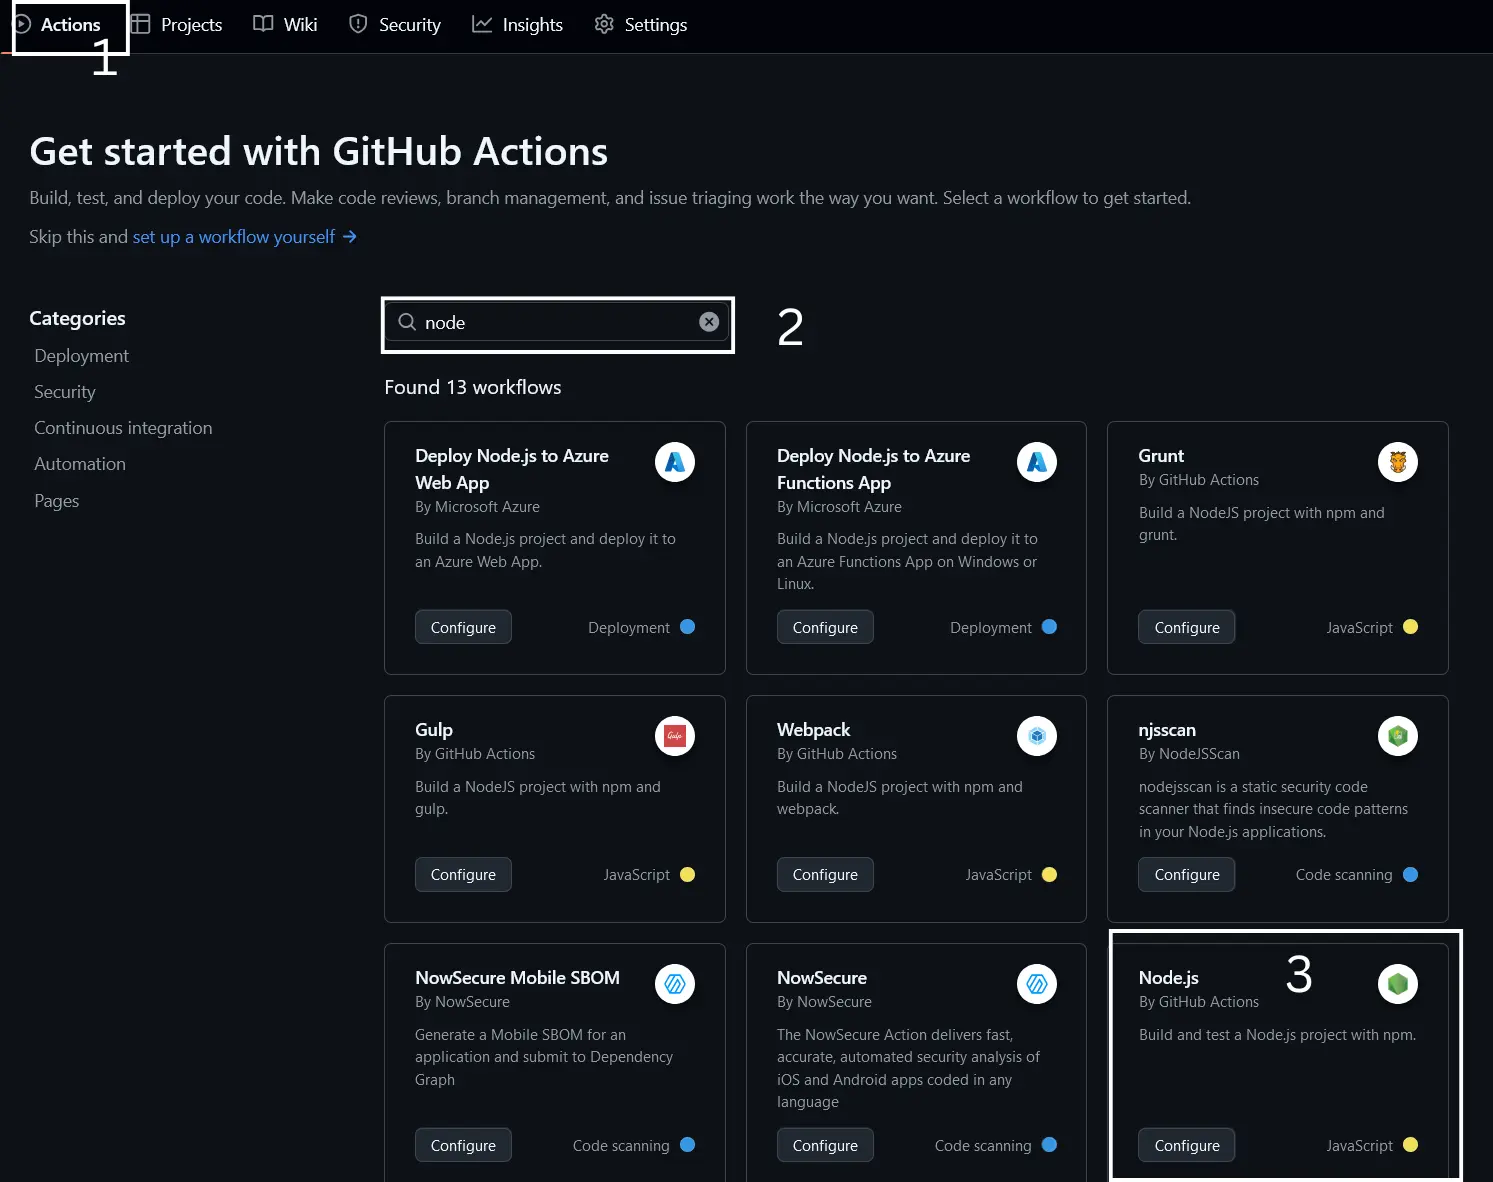
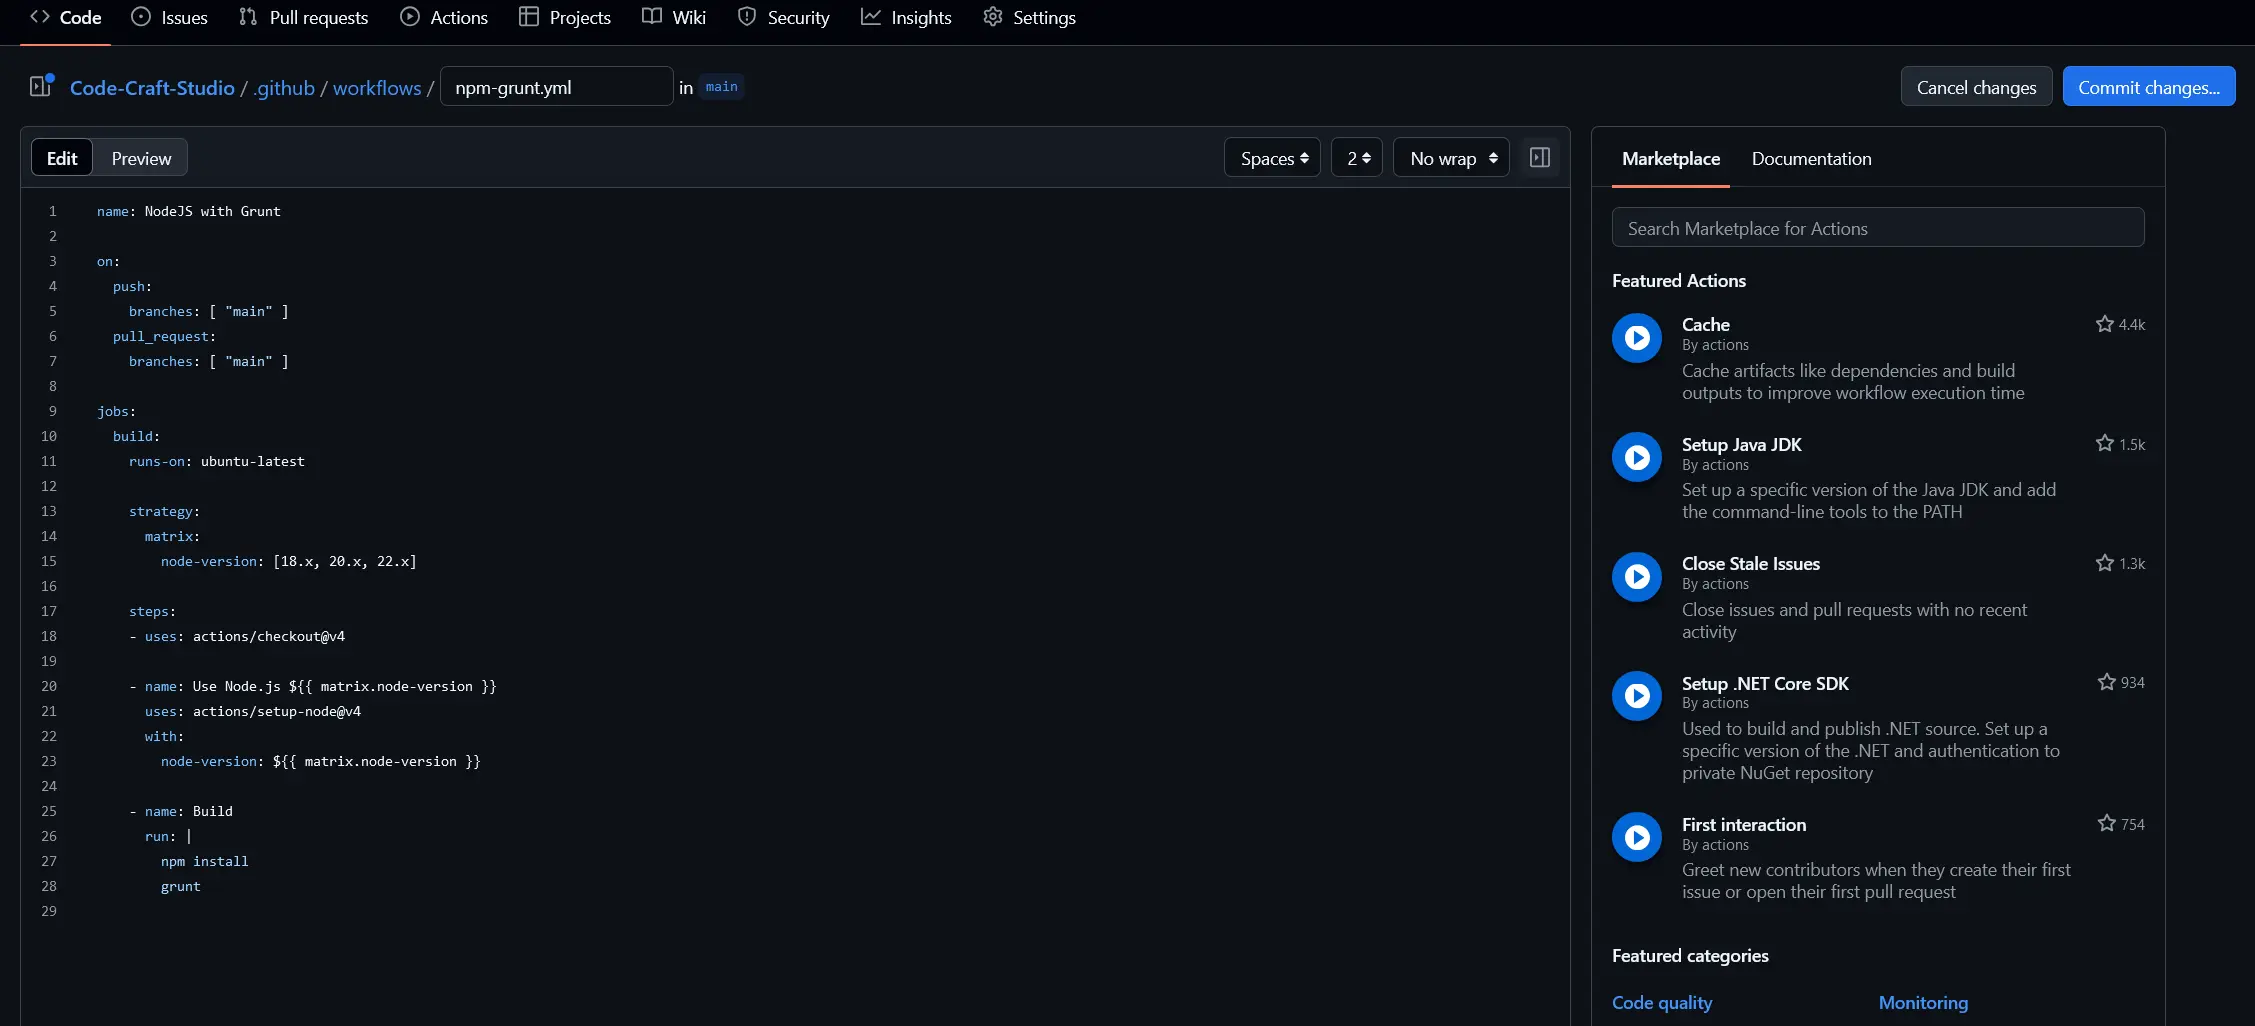
let's update this file and commit it, we change these followings'
remove pull request with its indentation.
change in runs-on: ubuntu-latest to self-hosted.
add env which taking env values where you setup in secrets and variable.
set a fix node js version like node-version:[20.17.0].
remove npm test.
given code this is for yarn
name: Node.js CI

on:
  push:
    branches: [ "main" ]

jobs:
  build:
    runs-on: self-hosted
    strategy:
      matrix:
        node-version: [20.17.0]

    env:
      BASE_URL: ${{ secrets.BASE_URL }}
    steps:
    - uses: actions/checkout@v4
    - name: Use Node.js ${{ matrix.node-version }}
      uses: actions/setup-node@v4
      with:
        node-version: ${{ matrix.node-version }}
        cache: 'yarn'
    - name: Install Dependencies
      run: yarn install --frozen-lockfile
    - name: create .env file
      run: echo "DATABASE_URL=${{ secrets.DATABASE_URL }}" > .env
    - name: Build Project
      run: yarn build
given code this is for npm user
name: Node.js CI

on:
  push:
    branches: [ "main" ]

jobs:
  build:
    runs-on: self-hosted
    strategy:
      matrix:
        node-version: [20.17.0]

    env:
      BASE_URL: ${{ secrets.BASE_URL }}
    steps:
    - uses: actions/checkout@v4
    - name: Use Node.js ${{ matrix.node-version }}
      uses: actions/setup-node@v4
      with:
        node-version: ${{ matrix.node-version }}
        cache: 'npm'
    - name: Install Dependencies
      run: npm ci
    - name: create .env file
      run: echo "DATABASE_URL=${{ secrets.DATABASE_URL }}" > .env
    - name: Build Project
      run: npm run build
- name: create .env file
run: echo "DATABASE_URL=${{ secrets.DATABASE_URL }}" > .env // this .env means saving file name in your vps file with .env you can use .env.local as well.above code snippet is use if you did not getting env value in your project means in your vps server you can add the echo statement to your nodejs.yaml file. i personally encounter error while i use Prisma and PrismaOrm will not take database env value while other values are take simply as well.
After writing this code commit in your main branch . then go to actions check build status. please ensure your project may have not any errors in building if you have any errors resolve first to check any errors enter this command in your local computer or in vs code
yarn build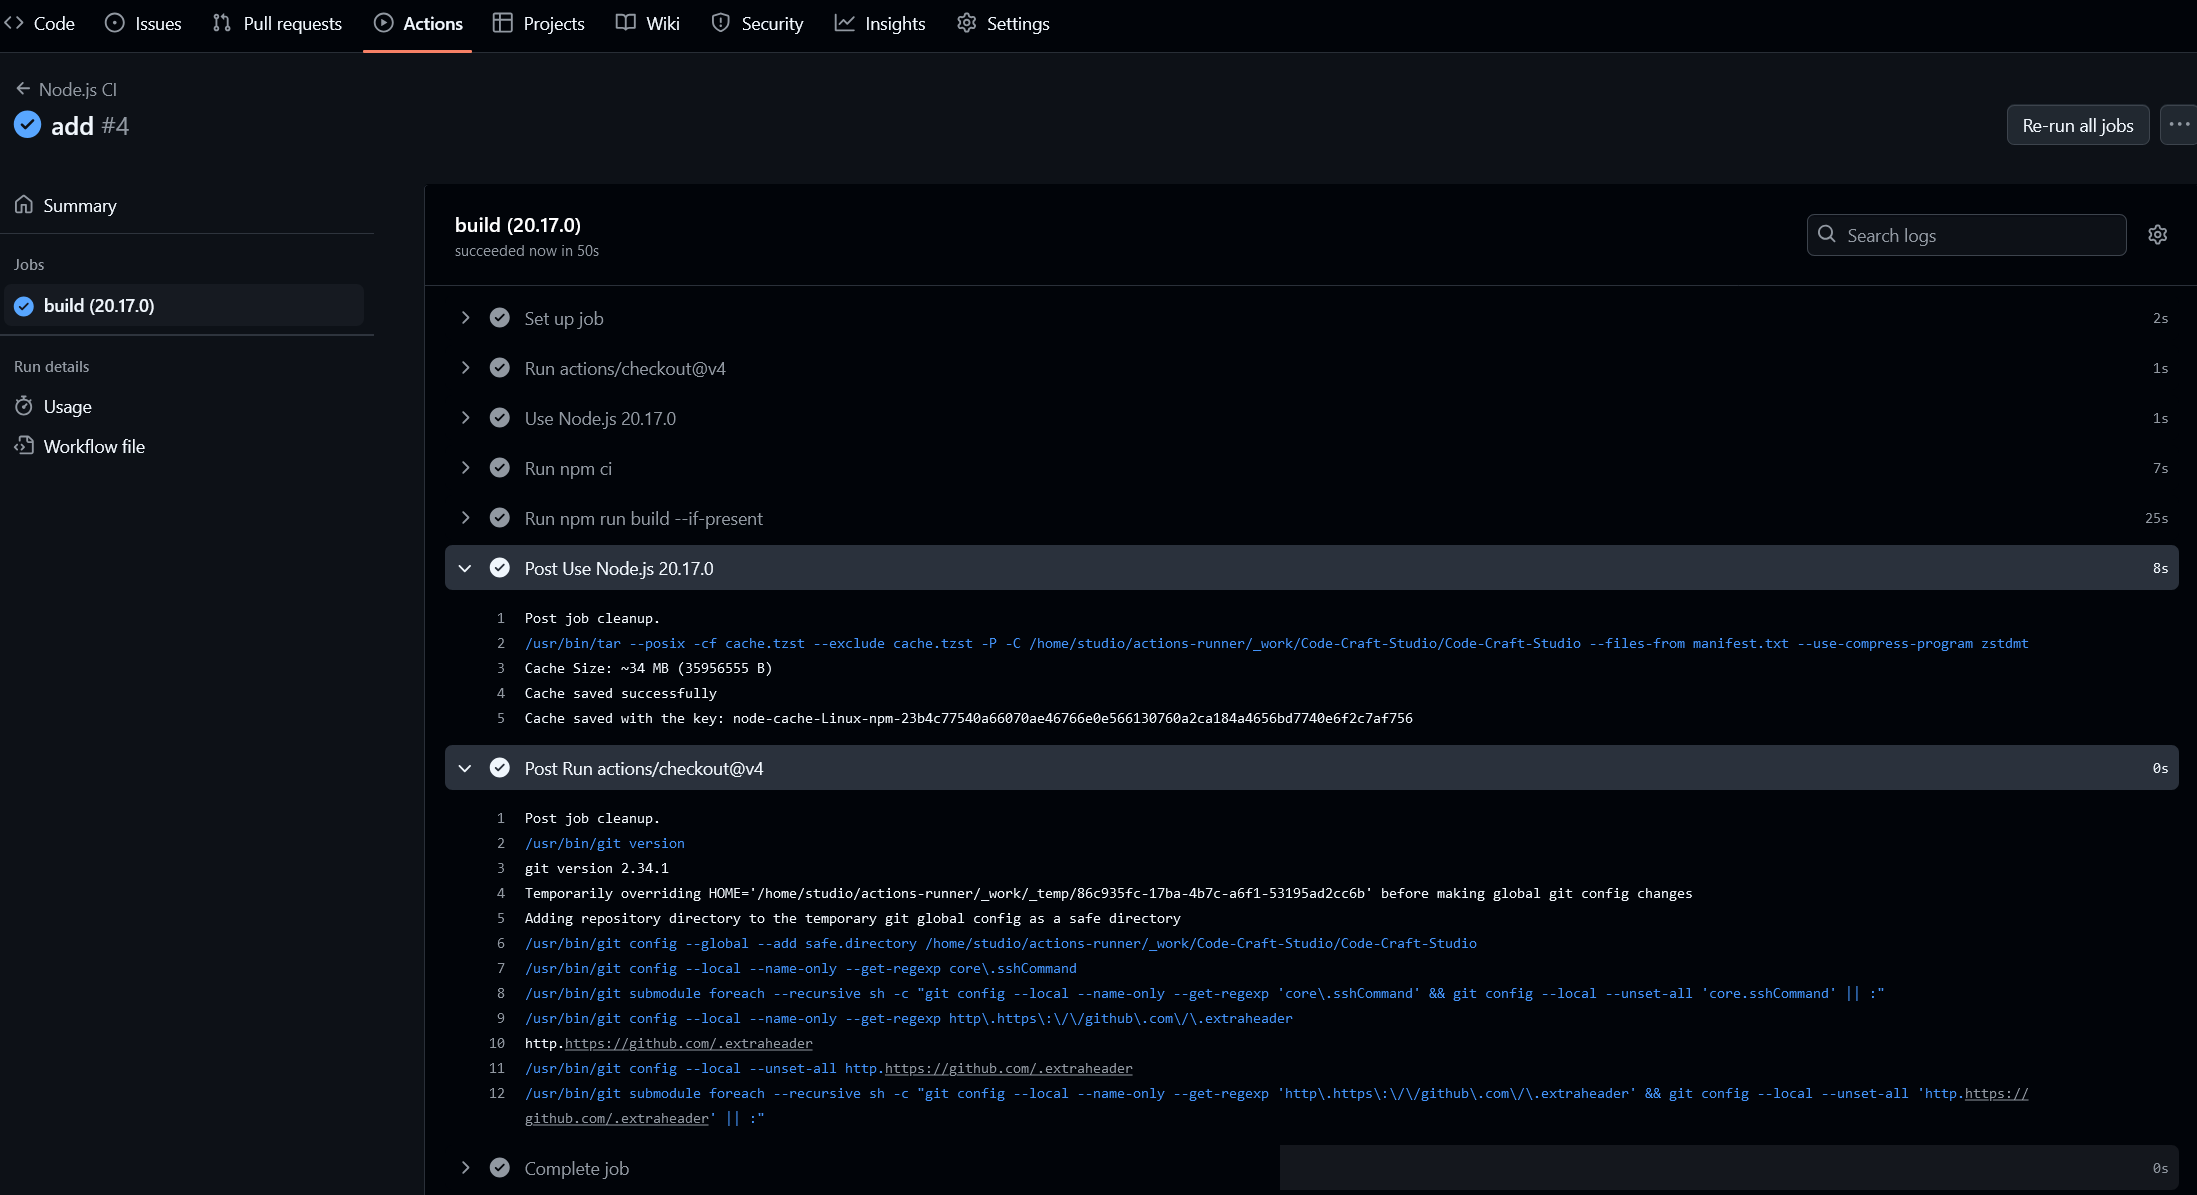
after completing jobs your repositories will come to your vps and having a build file,to host your project in vps server.
*example:
studio@sarvmandir:~$ cd actions-runner/
studio@sarvmandir:~/actions-runner$ ls
_diag                                    bin        externals                run-helper.sh.template  svc.sh
_work                                    config.sh  run-helper.cmd.template  run.sh
actions-runner-linux-x64-2.319.1.tar.gz  env.sh     run-helper.sh            safe_sleep.sh
studio@sarvmandir:~/actions-runner$ cd _work/
studio@sarvmandir:~/actions-runner/_work$ ls
Code-Craft-Studio  _PipelineMapping  _actions  _temp  _tool
studio@sarvmandir:~/actions-runner/_work$ cd Code-Craft-Studio/Code-Craft-Studio/
studio@sarvmandir:~/actions-runner/_work/Code-Craft-Studio/Code-Craft-Studio$ LS
LS: command not found
studio@sarvmandir:~/actions-runner/_work/Code-Craft-Studio/Code-Craft-Studio$ ls
LICENSE    next-env.d.ts    node_modules       package.json        public  tailwind.config.ts  yarn.lock
README.md  next.config.mjs  package-lock.json  postcss.config.mjs  src     tsconfig.json
studio@sarvmandir:~/actions-runner/_work/Code-Craft-Studio/Code-Craft-Studio$
now add pm2 server for every time your project will running.
step 8:PM2
what is pM2 ?
PM2 is an advanced process manager for NodeJS applications that allows you quickly start, control, or stop your node processes.
Now run your project with pm2
pm2 start --name "your project name" -- start --watch*example
studio@sarvmandir:~/actions-runner/_work/studio/studio$  pm2 start --name "studio" -- start --watch
┌────┬────────────────────┬──────────┬──────┬───────────┬──────────┬──────────┐
│ id │ name               │ mode     │ ↺    │ status    │ cpu      │ memory   │
├────┼────────────────────┼──────────┼──────┼───────────┼──────────┼──────────┤
│ 0  │ studio             │ fork     │ 0    │ online    │ 0%       │ 32.7mb   │
└────┴────────────────────┴──────────┴──────┴───────────┴──────────┴──────────┘
Now paste command:
pm2 startupAfter this you get a url which you have to copy and paste,But this command configures PM2 to start automatically at boot using systemd. It ensures that the correct Node.js version (managed by NVM) is used, and sets PM2 to run as the studio (your project name) user.
*example
pm2 startup
[PM2] Init System found: systemd
[PM2] To setup the Startup Script, copy/paste the following command:
sudo env PATH=$PATH:/home/sarvmandir/.nvm/versions/node/v20.17.0/bin /home/stuido/.nvm/versions/node/v20.17.0/lib/node_modules/pm2/bin/pm2 startup systemd -u sarvmandir --hp /home/sarvmandir
freeze the process via using this command;
pm2 savecheck multiple pm2 use:
pm2 listfor checking the logs
pm2 logs
Now check the pm2 is working correctly or not
sudo shutdownstart your VPS server from provider and see the your page is working correctly or not via.
http://your vps ipv4:port number

example = http://192.163.0.9:3000
Last pm2 step where you have to write again code in nodjs.yaml file
    - name: Change directory
      run: cd /home/action-runner/_work/your-repo-name/your-repo-name
    - run: pm2 restart 0
This 0 indcate your pm2 list index
or you can give name your project name also
    - name: Change directory
      run: cd /home/action-runner/_work/your-repo-name/your-repo-name
    - run: pm2 restart studio
*example
name: Node.js CI

on:
  push:
    branches: [ "main" ]

jobs:
  build:
    runs-on: self-hosted
    strategy:
      matrix:
        node-version: [20.17.0]

    env:
      BASE_URL: ${{ secrets.BASE_URL }}
    steps:
    - uses: actions/checkout@v4
    - name: Use Node.js ${{ matrix.node-version }}
      uses: actions/setup-node@v4
      with:
        node-version: ${{ matrix.node-version }}
        cache: 'npm'
    - name: Install Dependencies
      run: npm ci
    - name: create .env file
      run: echo "DATABASE_URL=${{ secrets.DATABASE_URL }}" > .env
    - name: Build Project
      run: npm run build
    - name: Change directory
      run: cd /home/action-runner/_work/your-repo-name/your-repo-name
    - run: pm2 restart 0
After committing this check all actions process will completely correctly and have no errors.
Step 9:Now Add and a point a domain name
Add DNS to your project domain from your provider.
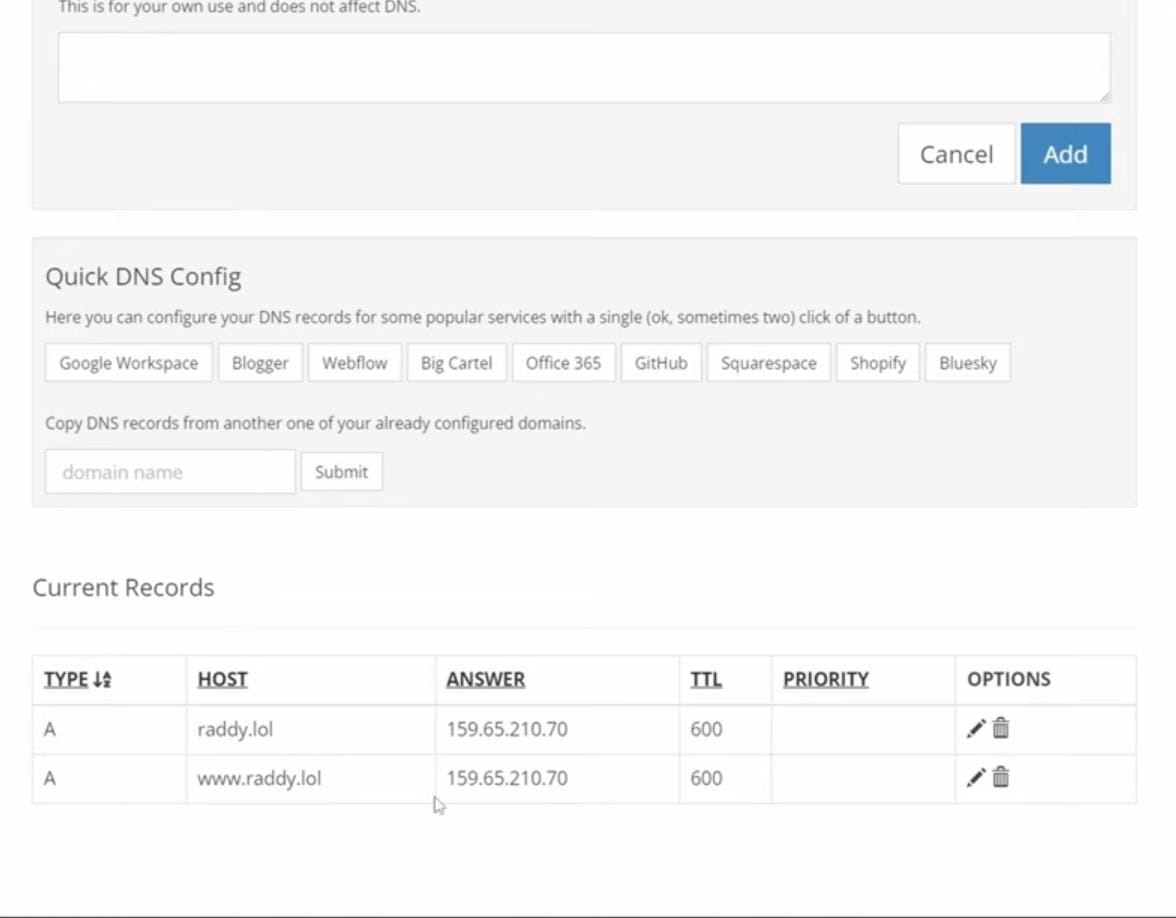
*this image is for example do it your own. type A is mandatory and add both domain or www.domain.com to point on your iP runs your server do not add port here only ipv4
Let's give a domain name to your project.
Install Nginx
What Is NGINX?
NGINX is open-source web server software used for reverse proxy, load balancing, and caching. It provides HTTPS server capabilities and is mainly designed for maximum performance and stability. It also functions as a proxy server for email communications protocols, such as IMAP, POP3, and SMTP.
sudo apt updatesudo apt install nginxCheck Nginx status with this command
systemctl status nginxnow if you go to your domain name it will show Nginx message like this
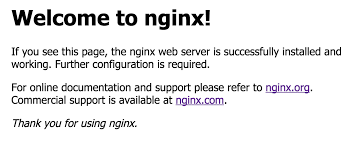
Reverse Proxy through nginx
sudo nano /etc/nginx/sites-available/example.com*example
sudo nano /etc/nginx/sites-available/studio.comAbove command will open nano editor where you have to write some configurations.
server {
    listen 80;
    listen [::]:80;
    server_name example.com www.example.com;

    location / {
        proxy_pass http://localhost:3000;
        include proxy_params;
    }
}
Now use Ctrl+X and Ctrl+Y to save the above file
sudo ln -s /etc/nginx/sites-available/examle.com /etc/nginx/sites-enabled/This creates a symbolic link (shortcut) to an Nginx configuration file (example.com) from the sites-available directory into the sites-enabled directory, enabling the site in Nginx.
Breakdown:
ln -s: Creates a symbolic link (a shortcut)./etc/nginx/sites-available/example.com: The original configuration file located in thesites-availabledirectory./etc/nginx/sites-enabled/: The directory where the symbolic link is placed, effectively enabling the site in Nginx.
sudo nginx -tthis command will show your nginx configurations is correct or not.
sudo systemctl restart nginxthis command will restart your nginx, now you can visit your domain name and it will open your project but without ssl,
Step 10: Add SSL to domain
Install certbot this bot will take ssl
sudo apt install certbot python3-certbot-nginxagain check configurations of nginx
sudo nginx -tGive request to certbot to take ssl.
sudo certbot --nginx -d example.com -d www.example.comThis command uses Certbot to automatically obtain and install an SSL/TLS certificate for example.com and www.example.com with Nginx.
Breakdown:
sudo: Runs the command with superuser (root) privileges, necessary for modifying Nginx configuration and installing certificates.certbot: The tool for automatically obtaining and renewing SSL/TLS certificates from Let's Encrypt.--nginx: Tells Certbot to use the Nginx plugin, which will automatically configure SSL for the specified domains in your Nginx configuration.-d example.com -d www.example.com: Specifies the domains for which to obtain the certificate.
What it does:
Obtains a free SSL/TLS certificate from Let's Encrypt for
example.comandwww.example.com.
Conclusion
This is complete beginner solutions for deploy your first or nth production projects in this blog we'll discuss about core concept of cicd,pm2,ssl and some ubuntu or linux basics command,after this your are good to go to host your projects easily and have access of code to copy paste in your terminal. here are complete step by step command is providing you to deploy your project , in next blog we will dissuades all hosting related to error because yo may encounter more and more errors while hosting your production code,still you get any error we are here to solve your error ,write your comment with your error we'll solve it, if you find helpful this blog please like and comment and share .

